Playable Retro RPG as Party Invitation: A How-To
November 2nd, 2018
Last year I went a bit overboard on invitations for my birthday party: I wound up building a retro RPG engine.
You walk around the party as my dog, Ember, meeting people and exploring the area. I made a custom map, added characters and scripted scenes, and even added some special effects like a day-and-night cycle.
To play with it in your browser, just head on over to dustydunes.dry.ly
Why?
I had to send an invitation. My friends needed to know where to show up, what to bring, and what they were in for.
I certainly could have used used Evite or Paperless Post, but that's the easy way out.
Why use an established service that's a perfect fit for the task at hand when you can spend a few hours to build your own game engine from scratch?
I figured I could combine a few things that I enjoy to create an invitation that was informative, creative, personal, and interesting.
As a side benefit, I got to turn my wife, friends, and dog into video game characters.
How?
I worked on three basic areas of the game: (1) the player, (2) non-player characters (NPCs); and (3) and props, the map, and special effects.
Below, I'll explain how I handled sprite animation, scripted behavior, map movement, and special effects. For this project I used React, but for the examples and explanations here I use vanilla JavaScript.
Note: I'm biased.
The Player
Sprite Animation
All the game art comes from Earthbound, one of my favorite Super Nintendo games. Each character has a sprite-sheet image which is a collection of sprites.
The number of sprites in a sheet varies. Ness and other player characters have more sprites in a sheet
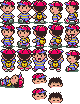


King/Ember has four sprites standing (or walking), two lying down, and three others (that I think are for climbing a ladder). For my game, I only need the four standing sprites.
To animate an NPC walking to the left, switch between the two bottom side views. To animate walking to the right, do the same thing, but first flip the images horizontally. To animate walking up, alternate between the normal and flipped back view.
Here you can see each frame with the corresponding sprite. I've added a blue border to show when the sprite is used normally and a red border to show when it's the flipped version:
Because each character's sprite-sheet was different, I created a character-definition file for each one. This file was a basic object that contained the width and height of each sprite in the sheet (e.g., 24x24 pixels), the location of the sprite-sheet image file (e.g., /assets/sprites/King.png), and an orientations object that listed the animation frames for each direction the character could face.Here's the definition file for King: https://github.com/davidguttman/eb-test/blob/614b83756546d8e649cc0d6722ea578cb4586abd/characters/king.json
Each frame in the orientation object was a simple array that had the x and y coordinate for the desired sprite in the sheet and whether or not we should flip that sprite horizontally.
For example, here's how I represented King's walking animation above:
{
  south: [
    [0, 0, false],
    [0, 0, true]
  ]
}
You can see that the first walking frame is [0, 0, false] and the second frame is [0, 0, true]. So both take the sprite at column 0, row 0 (the top left sprite), and the second frame flips it horizontally.
The code for this is pretty simple. To get started, you need a div with some styling: width and height are set to the sprite size (24px by 24px for King), and background-image is the sprite-sheet url image-rendering: pixelated to preserve hard edgesbackground-position and transform to choose which sprite from the sheet is visible:
The Map
Creation, Design, and Photoshop
The map also comes from Earthbound. I found the background image from vgmaps.com.
However, there's a twist. Because my party was a campout in the Joshua Tree desert, I naturally chose the map from Dusty Dunes Desert. However, the map from the game is too large and open. Without enough scenes, people, and props, it would feel empty and static. Thus, I wanted it to be enclosed, so that the player -- much like my guests -- wouldn't wander off and get lost.
Enter Photoshop.
I lifted and cloned elements like rock formations to create an amphitheatre-like area. I then spent time making sure that the sand appropriately matched the surrounding rock features, accounting for variations in ground type.
I also added some other features like tents and signs. Some came from the same Dusty Dunes Desert map; other objects (like the tents) came from a different map, Winters.
Walking, State, and Map Control
When you move the player character in-game, the sprite actually stays in the same place, with the map moving relative to the browser window. To make it look like the character is moving, I changed the offset of the background image -- the same trick I used with sprite-sheets.
Drag the map around to change the background-position value:
As you can see, King always stays in the middle of the frame. Simply by changing the sprite along with movement of the background we can make it look like King is walking on the ground.
Of course, the spell is broken when King is able to walk over tents and huge boulders.
Inaccessible Regions
After my new smaller, custom map was created, I needed to control where the character was allowed to walk, and I'm pretty happy with my solution.
I simply created a new empty layer on top of my custom map image, and anywhere I didn't want the player to be able to walk, covered it with black.
Once all the inaccessible areas were covered, I saved this layer as a two color gif.
Because these two images, the custom map, and the obstacle map are exactly the same size, I could easily take the x, y coordinate from the custom map, look at the obstacle map, and know if that particular point was accessible or not.
I used this in the game every time the character moves, I check to see if the desired location coordinates are a black pixel on the obstacle map. If they are, I don't update the players location.
Here's an example of using a canvas context to check pixel colors:
NPCs and Props
To make the world feel more alive, I added non-player characters that are around and doing things.
To make them look more alive, they are rendered with the same sprite-sheet technique. The only difference is that their sprites are not rendered based on user control, but scripted behavior.
Functional Behavior and Scripts
One of the things I've been very happy about with this game is that all the non-player characters and props are defined in a functional way.
Their position, orientation, and actions are defined by pure functions. At each frame, the NPC's position and orientation is determined by specific inputs. Most of the time this is the current clock time.
What's cool about this is everything is deterministic and repeatable. In theory you would be able to freeze time, rewind, etc. You can also predict where an NPC will be for any point in time in the future.
All NPCs (and props like the jukebox) are defined in a single array. Each NPC is an object with a name and loc.
The name is what ties that NPC to a character definition file as mentioned above.
The loc is a function that takes time as a single argument and returns an object with x, y, theta, and step properties. By combining the name with these properties, the game can render the correct sprite at the specified location.
Here's the NPC definition for the magic butterfly:
What's cool is that I could share movement patterns between NPCs. I did this using higher order functions (functions that return a function). Here's the dance function that accepts a starting direction and x, y coordinates and returns a loc function that accepts a time argument:
In addition to moving NPC characters, I also created a few props like signs, skyrunner (spaceship thing), and a jukebox.
I could script these similarly, and if you watch closely you can see that the jukebox and the skyrunner both use the bump() function. The jukebox bumps to the imaginary music (every second), and the skyrunner bumps when it gets hit with an imaginary hammer (every 10 seconds).
Dialog
The signs were there to show the player information about my party. On one of them I had a link to a google sheet with what to pack.
The other props were part of scenes. For example, the juke box is next to three NPCs that are dancing. Props can have their movement scripted just like NPCs (they're handled the exact same way by the game). The juke box bounces to simulate a music beat.
Similarly, the Sky Runner is being worked on by an NPC, so occasionally it bounces as if being hit with a hammer.
Signs and NPCs show dialog boxes at the bottom. This is how I provide a link to the pack list when the player walks near a sign.
Each NPC has an optional field for dialog, and if the game notices that the player is within a certain radius of an NPC, it will check for that dialog field and display it if it's present.
Special Effects
Day & Night Cycle
When playing Earthbound, the story begins at night. After a specific event, it becomes daytime. I thought it would be cool to add a similar day-and-night cycle to my game.
It took a bit to fiddle with this effect to make it look right, but in the end I found something I was happy with:
I used a CSS property called blend-mode. If you've used Photoshop or other image editors you're likely familiar with how this works.
When you have multiple layers, typically the top layer occludes the bottom layer. However, if you use opacity or something like background: rgba() you can see the bottom layer behind the top layer.
blend-mode provides a similar effect, with slightly different functions depending on the particular mode and the content of the top layer. Different blend-modes have different characteristics and behave differently.
For example, if you were to use "multiply", light areas of the top layer would be more transparent, and dark areas of the top layer would be more opaque. "Screen" does the reverse.
Here, I was happy with how "hard light" looked.
I achieved the final effect by setting up a function that changed the opacity and color of a top layer over time. I also translated real-world time to game-world time; so, four seconds of real-world time is one hour in-game.
I used two target colors -- one for night and one for sunset -- and, depending on the in-game time, I shifted between them.
Next Up
Alhtough I'm more than happy with how this project turned out, I may add more features in future versions. I've considered multiplayer, a character editor, interior spaces, combat, mounts and -- Okay, fine, I'm kidding about mounts.
Maybe for my next party I'll go for a Chrono Trigger theme.
